Pages

Tuesday, April 21, 2020

Building a Better Workbench - Painting on The Go

I suppose "Better" might be the wrong word choice here. In the days before the quarantine, (henceforth referred to as "the before times") I found myself painting at the shop once a week and frequently spending time outside of the house. At Cold Wars I spent quite a bit of time with the wonderful folks over at Hobby U chatting and painting. Thankfully everyone there was kind enough to provide or share supplies but I found myself spending a lot of time thinking of what kind of things I'd need for a travel set up, for things like shows, paint nights etc. After talking a bit with Impending Duff and seeing his set up at a class he ran here, I opted for the Creature Caster carrying case. This post is one part a review of that and one part my "must-have" tools, supplies, etc.

First up the bag.


I ordered the bag around the time Adepticon would have happened and postal issues aside received it pretty quickly. I opted to add on a couple extra trays but I'll get back to that in a moment. The bag by itself comes with a tray that will hold 48 paints and a sheet of 3" pluck foam.
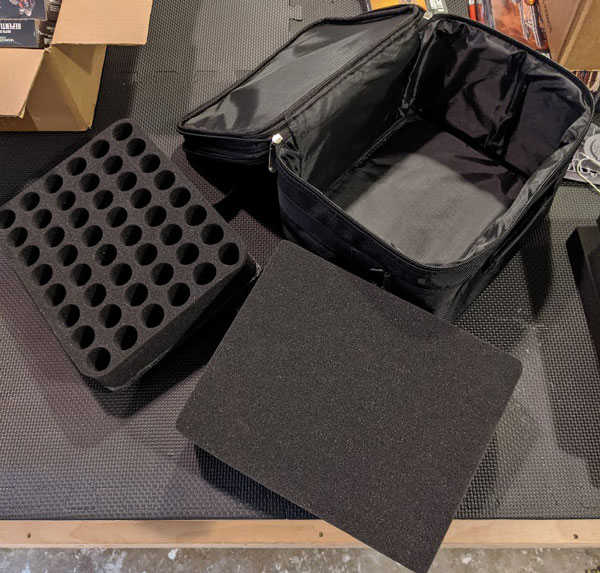


As you can see the bag also has a strap and extra pockets for holding odds and ends. This pocket here has specific holders for brushes as well. Probably more slots than I'll need but a nice option.  The bag is high quality and at first glance at least seems to fill all my needs. of course this is before trying to fill it. 

I won't pretend to want to drag my (incredibly) messy desk with me on the road but it would be nice to be able to bring a single project with me depending on where I'm going. I think the bag was designed pretty clearly with the Pro-Acryl paints in mind but the Vallejo Bottles seem to fit just fine.

When picking and choosing what I want to bring with me I set out with the intention of basically having a home set up and a road set up separate. I'm incredibly fortunate to have easy access to a hobby shop so my original plan was to simply buy doubles of the key paints as a sort of neutral palette to start.


Here are what I deem "essential" These are basically paints that I use in the majority of my projects.
Vallejo
Leather Brown
Black Grey
Iraqi Sand
Burnt Umber
Beige Brown
Ivory

Panzer Aces
Flesh Base
Old Wood

Army Painter
Strong Tone
Dark Tone
Chainmail

Citadel
Fleshshade
Retributor Armor

Greenstuff World
Black Ink

This leaves 34 slots to add specific colors for specific tasks which should be more than enough. My one critcism is that the slots really aren't wide enough for the citadel bottles but The majority of my citadel "must haves" have been transfered into empty vallejo style bottles. If you're mostly using citadel, p3 or Tamiya for example, you'll want to take advantage of the pluck foam.

The next step in the storage war is essential painting accessories.


List is as follows
Red Grass Games Palette
Red Grass Games Palette Paper
Brushes
Hobby Knife
Super Glue
Citadel Handle

I'm sure it doesn't need much explaining as the logic here is pretty simple. The bare essentials for any given paint session. Not pictured is the wavy attachment for the palette but I definitely made sure to bring that with me as I use a lot of washes and that attachment is essential for that.

At this point I packed the bag up and discovered a pretty major criticism. The way the straps attach to the bag, picking the bag up by the strap results in it tipping 90 degrees immediately. If it was easier to keep level I'd be comfortable leaving it on with paint in the pallet but as is, I took the strap off. Perhaps loaded completely with paint it does level out but I don't see myself filling the case every time.


All in all I'm happy with the bag, even more so after taking the set up out of my normal hobby area and into the living room to test it out. I'm sure it'll get use when the isolation is over.

You can see that it really does have the room to get some painting done "on the go." In the future, I'll use the spare foams to pack specific projects to work on and switch out on the fly. The case would easily double as a carrying case for skirmish games like Kill Team as well which is a nice bonus. All in All I'm pretty happy and can recommend it. 

Heres what I managed to get done before retreating back into the hobby room.


Thursday, April 16, 2020

Checking in from Quarantine

I'll admit I'm having some difficulty adjusting to the quarantine times and my actual hobby time has been a little sparse to say the least. It's been hard to paint wargame stuff when I'm not sure I'll get to use it again. With that in mind, I've shifted my focus over to finishing my Sisters of Battle in time for Stellacon. I painted this one during one of hour TrenchRunner Google Hangout Sessions.
This is the new Sisters of Battle Imagifier. I tried out contrast paints on the "statue" but probably could have achieved the same effect with a sepia wash or thinned out Iraqui sand. Can you tell I've been working on my Photo Booth?

Unfortunately that has been the only figure I've finished. We've been passing a lot of the time with Pandemic Legacy. For people not familiar with Pandemic, it's a co-op boardgame about dashing around the world and curing diseases. Players take actions each turn to treat diseases, move, or research the cure. Legacy cranks all this up to 11 by adding a campaign of sorts where actions in one game can affect the next. In legacy, you add stickers to the board and cards, tear things up and even open secret boxes that change the way the game works. It's all very exciting for someone who loves game design to see how it all comes together. I wont spoil anything else but if you're a fan of the original it is definitely worth checking out.


Finally I've been taking some stock on where I really want to go next. I had a big grand ambition to paint my game of thrones stuff but its been hard to be motivated to paint it right now with my regular gaming partner isolating. I recently interview Robey Jenkins about Horizon Wars: Zero Dark and I think I may try some solo Sci-fi gaming. Oathmarks caught my eye and I may give that a shot. All in all things will be scattered while I try and sort through finding my motivation

Sunday, March 22, 2020

AHPC X (5) - Post Challenge Check In


As everyone is aware at this point, the Tenth Annual Analogue Hobbies Paint Challenge is over. I thought I'd take this opportunity to talk a bit about the challenge and outline my plan of attack for the next few months.

I've harped on this over and over and over throughout the challenge that I'd like to paint and play a few different games. In particular; This is Not a Test, Necromunda, Age of Hannibal, and Poseidon's Warriors. Shortly into the challenge I also made the point that I'd love to play through War in Rohan before the next book comes out and as a result I think I mostly painted towards these goals.

The vast majority of my points this time around came from Necromunda. I finished the plastic box sets for Cawdor, Delaque, and Goliath as well as started on a lot of terrain. I now have 3 full tables worth of terrain for these games and in particular I finished and entered the Death Ray Designs Armageddon table into the challenge.


This being done will now give me enough terrain to totally play a game of necromunda with totally painted everything which for me is a rare feat. I found some lists for the plastic box sets so I figure I'll be trying it sooner rather than later and because it was all painted in the challenge I'm counting this as a win.


I also managed to finish all of the boats for the roman naval game. I'm not smitten with the rules yet but because I printed everything I really didnt waste a lot of money on the project and will be trying it again.


Now, in the not so great news, I've completely stalled out on Age of Hannibal. I knew painting 10mm figures was a bit of a chore and I just completely sidelined the project. The original hope was to get the game cracked out and playable but I think I'll just chip away on it here and there. Everything I've painted so far for it was posted in the previous post on this blog.

This is Not a Test is an interesting one. Once I have enough stuff to play this game, I'll be able to try out 7TV Apocalypse as well so its definitely high on my list. I even went as far as to prep a bunch of figures for it. The only thing that I painted unfortunately was the shanty building but I now have a absolute pile of stuff from crooked dice and a bunch of stuff primed and ready and will be simply rolling this project into the next wave.

On the Lord of the Rings front, I painted a dozen riders of Rohan, 10 Beserkers and a few characters. I've been given the go ahead to showcase a big diorama piece in the shop so it is in my best interest to get moving on this and my plan now is to paint up all my dunlending figures before tackling the Warriors of Rohan. They announced a hobby book for LoTR so I think I still have a bit of time before the next book in the series comes out.

Going Forward
I think one of my major motivators was structuring my painting into specific games. I'll be continuing this trend going forward and picking 3 or so specific projects to focus on. I really want to begin thinning my hoarde this year and I think its a good way to motivate myself. That said...

This next wave of painting's projects includes:
This is Not a Test
This is a no brainer. I own such a pile of stuff for it and have been printing more buildings for it. I have some giant ants and some mutants by Crooked Dice on the table now and after that I think I'll make some lists and try the game out with some basic terrain. This is also going to open the table to games like 7TV Apocalypse and Zone Alfa.

Game of Thrones
I bought heavily into this game while I was at Cold Wars and got a chance to try it. So far I love it and am in love with the figures and cannot wait to play more and start painting. I've basically got enough stuff for 4 factions now and am probably going to start painting that soon.

Sisters of Battle
I'm really into painting these figures and would like to finish the ones I have at least and get 500 points or so ready for some games we have planned this summer. I just finished the first squad of Seraphim in the challenge and ordered one of the new characters to paint. I haven't bought too crazily into the army yet so I'd like to get ahead of it for once.


Blood and Valor
Finally WWI has been on my radar for a long time and I'd really like to get a game of it on the table soon. I have a pretty big pile of the amera vacuform trench already done and a platoons worth of british painted and ready to go (though I may rebase just to match my more modern basing sensibilities.)
I put together a 150 point German list and am eagerly awaiting a test game.

So there you have it. In no particular order there are a few projects that didnt make this "work on immediately" cut or that I'll probably chip away on including but not limited to;
Oak and Iron, Age of Hannibal, Zone Raiders, Infinity, Crisis Protocol, Batman ect
Additionally I'd really like to take a short break from wargame painting to finish a bust or figure kit just for my display case. In the wake of all this Covid-19 crazyness I have no idea if I'll be entering in shows this year so I think it's important to me to continue to crack out projects like these.

Some stuff to look forward to for sure!

Monday, March 2, 2020

Shanty Town (1) - Building Something from Nothing

Something I've mentioned before is my growing interest in post apocalypse gaming. I've long been a fan of This is Not a Test and back in November at Fall-in I picked up the 7TV Post-Apocalypse Starter Set (and a small fortune in figures from Crooked Dice) from my friends over at Phalanx Consortium. This have sat idly by while I've debated what exactly I wanted to do with the project. In the mean time, I've also picked up a bunch of the Lead Adventure Forum Stalker Figures and have decided it was time to get some terrain going. The stage is set, lets dive right into the content.

This article was also published on the Michigan Toy Soldier News From the Front Blog

Building a Shanty Town: Painting Tutorial


Every so often, I'll come across some sort of figure, terrain piece, vehicle, whatever that just screams "paint me!" While browsing thingiverse after game night one week, I discovered this amazing bundle of files to make a totally modular Shanty Town by Terrain4Print. If you have a printer of your own and want to follow along with my guide the files are available below. Here's the example photo that started it all.
Buildings
Barricades
Junk
Obstacles


Any 3D printing project is gonna start in the same place, at the slicer. I kept my settings pretty standard and opted for a .2 layer height using prusaslicers default .2(Speed) profile. Let's address something up front, Layer Lines. I don't deal with them. When comparing the costs, availability of models, ease of access, range, modularity etc etc etc between 3D printed terrain and commecially available stuff, layer lines are simply part of the equation. If you don't like the lines (and honestly, I don't love them) you can spend some time sanding, then finish with a primer like 3D Prime from Badger to hide as many of the lines as possible. You can also limit the lines from the beginning by printing at a smaller layer height but because of the sheer volume of stuff coming off my Prusa Printer, I almost always choose to opt for speed over detail. Once a part is loaded into the slicer, its off to the printer to wait.


In this particular pack from Thingiverse, you simply pick 4 walls you like, 2 short and 2 long, and print the roof that fits to that design. I chose 4 walls, 2 with doors and windows, found the correct roof and began printing. The total print time for the 5 parts for this building was around 20 hours and was printed in Prusament Vanilla White


I assembled the building in the usual way with super glue. There's a pretty easy system for making the roofs removable but I decided to glue the roof on for stability.

Once the building is assembled it's time to hit it with some paint. I usually prime all my 3D printed stuff. I decided to prime these with Army Painter Gun Metal spray. The majority of our building is this metalic corrugated metal material and this will save a lot of time in the long run.


The first step is pretty simple. Wash a handful of the panels with Black and a handful with dark brown. There's no right or wrong here just, vary the colors a bit so its not all the same shade of metalic.


Next up, I took the building to the workbench to basecoat all those non-metallic details (bricks, tires, wood, cloth) in what ever colors I felt like. I used my usual colors for these, Old Wood and Flesh Shadows from the Vallejo Panzer Aces line for the wood and bricks, Vallejo Black Grey for the tires and Brown Violet for the cans.


Once all the colors are laid down and we're happy with the general scheme it's time to do some weathering. I took the building back down to my game room, grabbed some Vallejo Acrylic Washes and Weathering Effects and a cheap flat AK brush and went to town.  I used the following washes to get the job done.


At this point you simply want to weather the model, I started by washing all of the "details" with black or dark brown depending on the material. The wooden bits and brick parts got a brown wash whereas the tires and washing machine got a black wash. The cans got both. Using the dark rust wash, I painted splotches (technical term) any where the metal was worn or I wanted to break up the color a bit, typically where two panels met but again there is no wrong answer. The Rust texture is "stippled on" roughly. over areas where the rust should look really bad. There's just a hint of texture to this one and I love the effect it leaves. Finally, I sparingly added some streaking grime near where the roof meets the wall in spots to show a gross build up.

At this point I'm calling the piece done. This is the kind of project you can pant in a day and with how quick these paint up, I'll be able to cover a small table in a weekend. I also think its a great first project for someone wanting to dip their toes into a terrain project because, believe it or not, this is actually only the second terrain piece I've ever finished painting. Most of the terrain I've done has either been pre-painted or I've had it painted by someone else.


Next up on my agenda for this project is to start doing some multi floor buildings, then its time to print and paint scatter terrain. Finally, I'll finish the project with a wall to defend the town.

Saturday, February 15, 2020

Flintcon 2020

Each year in Flint Michigan, a friend of ours runs a nice little convention called FlintCon. Its a pretty short drive, there's usually a decent turn out for the flea market and the games are usually pretty good. I'm very much so a "convention-fan" so I don't usually miss an opportunity to go to a show more or less in my backyard.

Photos after the Jump


Friday, February 7, 2020

Punic Wars (1) - The First Batch of Romans

The long awaited Punic Wars project actually has some paint on it now! I've long had an interest in gaming the era and decided to liquidate my 28mm figures in favor of the smaller, more affordable, more "amass-able" 10mm ones. I talked about it during the challenge and mentioned it in the prep stages here but I picked a battle from the Age of Hannibal scenario book and finished purchasing everything for it.

Much like my English Civil War Collection, the entire collection is based on 40mm squares with 1 unit being one base in the Age of Hannibal rules.

First on the agenda is the Roman Army. I originally figured I'd paint a unit for each side and alternate back and forth to keep the project playable as I go but to be honest, I think seeing the roman army finished would be a better motivator than painting nearly 700 figures before calling anything "done"

And here is the first unit type. Velites for the Roman forces.


I don't have step by step photos but they are dead simple.

Prime black, paint the flesh with Pz Aces Flesh Base, paint the Red with Mephiston Red, Spear Shafts are Pz Aces Old Wood and the wolf pelts and shield backs are Leather Brown.
The trick with painting the 10mm figures quickly in my opinion is to prime black and leave a touch of black between colors. This makes them pop just a bit without feeling like I need to highlight. These aren't winning awards but the batch of 25 figures was painted and based in just under an hour and 20 minutes.

I also managed to crack out the first couple bases of Princepes. These figures are 2 strips to a base with a total of 10 figures. The scenario I'll be running calls for 7 bases of these. I have some Celts on the desk now but I think those will be a wip while I complete the first wave of Numidians.


So here we have everything done for the Romans so far. The bases are my usual fair though this time I used Woodland Scenics 2mm grass.


The usual things apply here, in that this is one of a great many projects i have in the works but seeing them come together for these photos I'm very happy with the track I'm on.

Tuesday, January 28, 2020

The Battle of Hoth Playtest


As part of the convention circuit this year. Dan and I are running a big 10mm Battle of Hoth scenario at FlintCon in February. This evening the normal group and I set up what is basically the first playtest game. After some deliberation we settled on trying out Future War Commander for the rules. 

Originally we were going to use Horizon Wars as a bit of an homage to an earlier episode in which we reviewed the rules but the more I thought about what I wanted from the game, the more we looked for something a little more streamlined.

I've rated the troops pretty much as such for the first game and like all my bright ideas, what is present on paper is just the tip of the iceberg compared to the ideas I have up top.

Storm Troopers
MV 10 ATTACKS 3/30 ASSAULT 3 HITS 4 SAVE 5
At-st
MV 15 ATTACKS 4/60 ASSAULT 4 HITS 4 SAVE 4
At-at
MV 10 ATTACKS 6/60 ASSAULT 4 HITS XX SAVE 3
Rebels
MV 10 ATTACKS 3/30 ASSAULT 3 HITS 4L SAVE 6 COST 20
Snow Speeders
MV 10/20 ATTACKS 4/30 ASSAULT 3 HITS 4 SAVE5/6 SEE NOTE
ATTACH TOW 4+ DROP SAVE TO 5 AND MOVE TO 10
Turrets
MV - ATTACKS 4/60 ASSAULT - HITS 5 SAVE 5

This was more or less my blind guess at what would work. The Rules state that troops in the open are hit on a 4 and troops in trenches on a 6 so my logic is "rebels will be hard to his but easy to kill. Stormtroopers will be hard to kill but easy to hit" We'll see how it pans out in subsequent tests. On to the Scenario


Rebels (Deployed in the Trench Lines)
XX x Stands of Infantry
5 x Gun Turrets
4 x Snow Speeders (Recyclable)(Start in Echo Base)

Empire (Deployed on the board edge)
15 x Stands of Infantry
4 x At-St
3 x AT-AT

And some eye candy from the Playtest game


Some thoughts. Most of the numbers worked really well, especially considering my lack of experience with the rules.The Snowspeeders however basically need an entire rewrite and after a lot of debate we decided to basically come up with a new system for them that would make it a little easier to attach but a little harder to kill. I think we'll be testing it once or twice more before the show but in general, it's almost there. Ill need to print the turrets and do a little more basing but otherwise I think we're just about ready. I have a page full of notes to tweak some stuff but its nothing major. We are on track for Flintcon