Pages

Showing posts with label Terrain. Show all posts

Monday, January 15, 2024

Boarding Actions Build Log (1)

 I've always maintained that I like the idea of 40k even if I don't adore the game itself. The idea of a 2k army is daunting and expensive for my ADD riddled brain. I have been flirting with the idea of a zone mortalis board for a long time (see earlier posts on this very blog) but to be honest with the new Boarding Actions Game mode and terrain I'm probably scrapping that terrain. You can google Boarding actions to look at the pretty pile of sprues but in short, the idea is "lil fights in spaceships" 500 Points, limited options, quicker games.

I wasn't super interested in the box itself until I stumbled across this originally on reddit. Orkitect Studio has produced a 3d printable version of the board. Thinking I could save a bit of money, I opted to start printing.

When these tiles work they are absolutely incredible. There's a whole system in place for magnets and wires to make the tiles pop together, there's options for all magnets or snap fits for no magnets and the designer has already modeled and released some of the neat unique bits from one of the expansions. 

Cue the sound effect of the record scratch

I wrote the above in march of 2023. Its why "finish boarding actions board" made my list two years in a row. Because I'm lazy. In my defense this time I have some legitimate concerns.

The text you're reading now replaces a pretty lengthy paragraph I had written back in march and the keen eyed among you may notice the pieces are made of two different materials if you look close. One of the issues I had in 2023 was that my prusa finally took a crap and blobbed up. I spent the better part of a week disassembling and what have you to clear jams and scrape plastic. I finally came to the determination it was gonna need a new thermistor, then a new hot end, then this then that. I tore the thing apart and chipped away on repairing it for a few months where it sat unused next to my Mars 3. An idea sparked and I decided to start this project on the Mars. I won't bore you with too many details but needless to say, it was not the right medium for this project. I spent a small fortune in failed prints and broken resin and fails and cleanings. I said I'd fix the printer but with my day job (fixing 2d printers) I never had the drive to actually finish it. Around Christmas I ran some numbers and made a decision to replace the device with a new Bambu P1S. There will be more on that at a later date, but the main take away here is this

I went from this


to this in about a week.


So what you see now, is a whole boarding actions table. I purchased a cardboard mat from one of the starter sets and have since this photo glued in all the magnets. Next up is painting and wire on the column pieces.

Sunday, April 30, 2023

Demonship (1) - It's Here!

 As I mentioned in the Adepticon wrap-up. Demonship is a new "microgame" from MalevMinis and Blacksite studio. Its basically a sci-fi solo dungeon crawl. I managed to get a set of the terrain preordered at Adepticon and it arrived on Friday. I've got it all built now and wanted to show it off. 


 All in all it was a relatively straight-forward build. I accidentally left out a couple magnets in the "palete" looking bit. I got the whole thing built in an evening and a half and didn't really count the magnets until I realized I had already glued it together. 


The "alpha" rulebook I picked up at the show is neat and I am looking forward to trying the game out but since building this set the "finished" game is now available for pre-order HERE


 The set is great. Super modular, its a blast just showing it off and setting up little rooms. I was super excited to see it came with magnets and the whole thing stores right inside the base. No room for figures but I think the alpha book may fit though I haven't tried yet.

I'll check back when I've gotten the game on the table but for now, this was a reasonable build and it seriously checks my "minatures are cute" checkbox where small stuff is just sorta neat.

Tuesday, January 12, 2021

Terrain - Into the Forest

Reposted with Permission on News from the Front
 For as long as I've been a gamer I've struggled with trees. It seems like a no brainer sure, but I can't stand clump foliage. About 10 years ago, I spent a weekend making trees. Slathering Woodland Scenics tree armatures with glue and getting all sticky trying to make trees look presentable. When I finally got some stuff finished, I thought they looked great, but they fell apart after a few months of use. Over the years I've seen some great solutions but for what I wanted nothing fit exactly what I was thinking. Battlefield Terrain Concepts makes some amazing trees but for how many I wanted, it was a little beyond my budget. Woodland Scenics themselves makes some great premade trees as well but they aren't quite as durable as I'd have liked, and still need to be based in some capacity.

With all this in mind, I decided to 3d print my forest. After a bit of research, I found this set from Printable Scenery. 


The set comes with 5 different tree designs, 2 different tree stumps, and 2 fallen trees. The canopies are separate pieces and come in 4 designs. The product page shows which parts to print for which tree.

In order to fulfill my needs, the trees need to be readily available, easy to assemble or paint, have decent variety, and be durable. Aside from print time, these check all of those boxes so I started printing. 

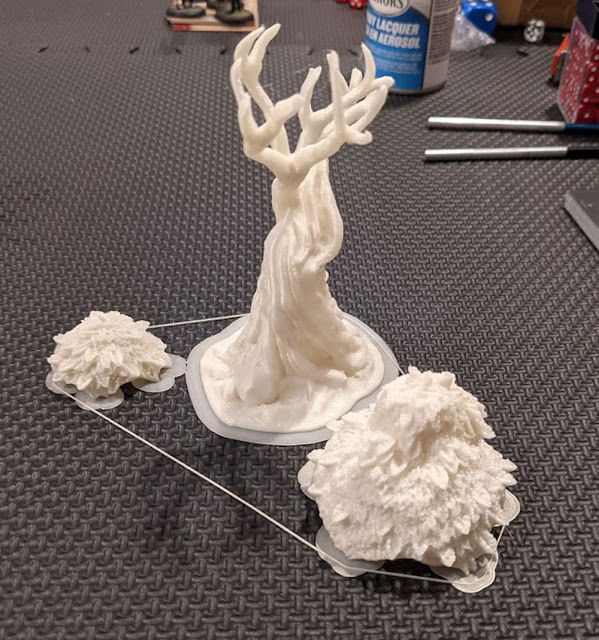
I started by printing a pretty large batch of stuff. The key to the plan here is two things. First of all I printed everything for any given tree in one shot and while printing I set the settings to print with a brim and with a perimeter. This means when any tree prints it will effectively be grouped together. This meant I could print a tree here or there as I was running low on a spool over the course of a few months. Each Tree took somewhere around 10 hours to print so I'd usually fire one up around dinner time and pop it off the plate before work the next morning. You can see here how the tree almost prints on a sprue, keeping the canopies sort of attached. The thin layer on the bottom peels right off by hand. 


In order to meet one of my other demands (variety) I printed some trees at 75% size. You can also increase the size or mirror all the parts to get a slightly different look.  Basically when it's all said and done, you can get a reasonably variety going. 

The next step was to prime everything. I labeled each tree on the bottom with a letter and used Rustoleum Camo Dark Green and Camo Dark Brown Spray primers. Finding a flat brown spray was a bit of a challenge but I'm reasonable happy with these colors. All the canopies are sprayed at the same time and then resorted to match the trees they printed with. 


Once all the individual parts are sprayed, everything is drybrushed and details are painted. I used cheap acrylics from a craft store like Michaels. There's nothing stopping you from using Vallejo, but I like the artist loft paints for terrain because they tend to hold a little better with use. For this project I used Burnt Umber and Gray from Artists Loft and one of the greens from the Liquitex Basics Range. You don't need these specific colors or brands, just a gray, a mid brown, and a medium green are fine.


Drybrush the tree all over with your medium brown and the canopies all over with the green. I was really rough with the green drybrushing and let a ton of it get in the recesses as well. There's no need to be careful here in my opinion. At this point the project was all about speed. You can see how the medium brown makes some of the detail pop without looking too over the top. Since these were printed on a FDM printer, there are some layer lines visible. As I've mentioned before, I dont really worry about it on wargame terrain, but the drybrushing has a bit of a tendency to highlight the layer lines, especially on the tops of surfaces. Using the thick craft paints has the added bonus of mucking up some of the layer lines. When Drybrushing, leave just a tiny bit more paint on the brush than usual and it seems to be ok to my eye.

By varying up the "wetness" of your brush in the green drybrush step, you can see how it changes the tone a little bit. It's subtle but definitely helps break up the monotony of the green a little bit.


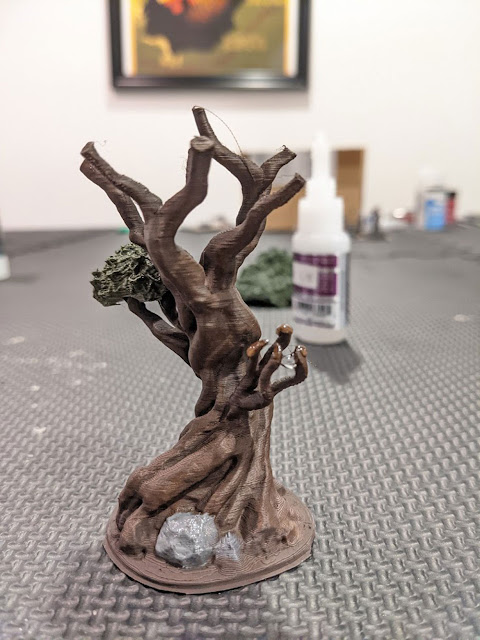
The next step is to pick out the rocks around the base with grey and then finally glue it all together. Having based the tree in brown, means you dont really need to be too careful with the grey for it to all be tied together. I switched over to a size 4 synthetic to paint the rocks and just made sure they were covered. When glueing the canopies on, I made sure to sort of slather the ends of the branches in glue. When the canopy is attached, it can be hard to tell exactly where it will sit ahead of time, so better safe than sorry.


And the final Product


All in all, I think the trees take something around 10 minutes each to paint and the longest process is definitely actually printing them. I've been printing trees off and on for months but I think its well worth the effort. Obviously you could take these same prints and really go to town on them with some more detailed painting but for fleshing out a game table I think this does the job wonderfully.

Working in an assembly line, the entire set took about an hour to get everything brushed and glued together.


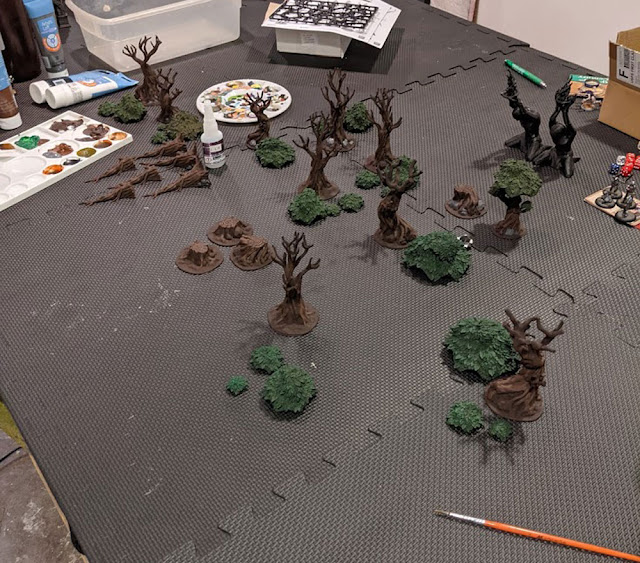
And here we go! 10 trees, about a month of printing off and on and a little bit of paint work later. 


It doesn't seem like a ton, but this set fills a 3 x 3 board pretty nicely unless youre looking to do an actual forest. As far as scatter terrain goes, I think this is more than enough for an average game but I'll probably be printing another 10 or so over time to fill out the table for games like Flint and Feather or Carniverse


Adding just a couple pieces from my collection here, you can see its basically all you'd need for a small skirmish game. 


So, how do I feel about this as a solution? I think I'm happy with it. I didn't realize until writing this article, just how much time I'd spent printing stuff for it. The longest tree took about 14 hours to print and thats a pretty long time to tie up a printer when you consider that there's 10 trees on the table. I really like that I can set up the printer and then go on to something else though. In terms of variety, theres just 3 of the five designs on this table. The set came with another two tree types that I haven't printed yet and theres still the option to vary up the designs present by changing the size or mirroring parts.

In terms of cost, I haven't done the math but per tree they arent on the expensive side as filament is pretty cheap. The labor involved wasn't bad either with how easy the trees are to finish. 

Overall then, I think this was a good investment for my terrain collection. I don't think the trees look as nice as the foliage types but they are a lot more durable and if I ever need more, I can simply hit print.

Monday, March 2, 2020

Shanty Town (1) - Building Something from Nothing

Something I've mentioned before is my growing interest in post apocalypse gaming. I've long been a fan of This is Not a Test and back in November at Fall-in I picked up the 7TV Post-Apocalypse Starter Set (and a small fortune in figures from Crooked Dice) from my friends over at Phalanx Consortium. This have sat idly by while I've debated what exactly I wanted to do with the project. In the mean time, I've also picked up a bunch of the Lead Adventure Forum Stalker Figures and have decided it was time to get some terrain going. The stage is set, lets dive right into the content.

This article was also published on the Michigan Toy Soldier News From the Front Blog

Building a Shanty Town: Painting Tutorial


Every so often, I'll come across some sort of figure, terrain piece, vehicle, whatever that just screams "paint me!" While browsing thingiverse after game night one week, I discovered this amazing bundle of files to make a totally modular Shanty Town by Terrain4Print. If you have a printer of your own and want to follow along with my guide the files are available below. Here's the example photo that started it all.
Buildings
Barricades
Junk
Obstacles


Any 3D printing project is gonna start in the same place, at the slicer. I kept my settings pretty standard and opted for a .2 layer height using prusaslicers default .2(Speed) profile. Let's address something up front, Layer Lines. I don't deal with them. When comparing the costs, availability of models, ease of access, range, modularity etc etc etc between 3D printed terrain and commecially available stuff, layer lines are simply part of the equation. If you don't like the lines (and honestly, I don't love them) you can spend some time sanding, then finish with a primer like 3D Prime from Badger to hide as many of the lines as possible. You can also limit the lines from the beginning by printing at a smaller layer height but because of the sheer volume of stuff coming off my Prusa Printer, I almost always choose to opt for speed over detail. Once a part is loaded into the slicer, its off to the printer to wait.


In this particular pack from Thingiverse, you simply pick 4 walls you like, 2 short and 2 long, and print the roof that fits to that design. I chose 4 walls, 2 with doors and windows, found the correct roof and began printing. The total print time for the 5 parts for this building was around 20 hours and was printed in Prusament Vanilla White


I assembled the building in the usual way with super glue. There's a pretty easy system for making the roofs removable but I decided to glue the roof on for stability.

Once the building is assembled it's time to hit it with some paint. I usually prime all my 3D printed stuff. I decided to prime these with Army Painter Gun Metal spray. The majority of our building is this metalic corrugated metal material and this will save a lot of time in the long run.

The first step is pretty simple. Wash a handful of the panels with Black and a handful with dark brown. There's no right or wrong here just, vary the colors a bit so its not all the same shade of metalic.


Next up, I took the building to the workbench to basecoat all those non-metallic details (bricks, tires, wood, cloth) in what ever colors I felt like. I used my usual colors for these, Old Wood and Flesh Shadows from the Vallejo Panzer Aces line for the wood and bricks, Vallejo Black Grey for the tires and Brown Violet for the cans.


Once all the colors are laid down and we're happy with the general scheme it's time to do some weathering. I took the building back down to my game room, grabbed some Vallejo Acrylic Washes and Weathering Effects and a cheap flat AK brush and went to town.  I used the following washes to get the job done.


At this point you simply want to weather the model, I started by washing all of the "details" with black or dark brown depending on the material. The wooden bits and brick parts got a brown wash whereas the tires and washing machine got a black wash. The cans got both. Using the dark rust wash, I painted splotches (technical term) any where the metal was worn or I wanted to break up the color a bit, typically where two panels met but again there is no wrong answer. The Rust texture is "stippled on" roughly. over areas where the rust should look really bad. There's just a hint of texture to this one and I love the effect it leaves. Finally, I sparingly added some streaking grime near where the roof meets the wall in spots to show a gross build up.

At this point I'm calling the piece done. This is the kind of project you can pant in a day and with how quick these paint up, I'll be able to cover a small table in a weekend. I also think its a great first project for someone wanting to dip their toes into a terrain project because, believe it or not, this is actually only the second terrain piece I've ever finished painting. Most of the terrain I've done has either been pre-painted or I've had it painted by someone else.


Next up on my agenda for this project is to start doing some multi floor buildings, then its time to print and paint scatter terrain. Finally, I'll finish the project with a wall to defend the town.

Sunday, January 12, 2020

Hive City Table (1) - Plans and First Progess

In addition to the Zone Mortalis Table (more on that very soon) I'll be working on and project logging a "Hive City" Table. Did I mention I went off the deep end here?

First the inspiration photos can all be found here https://imgur.com/a/RqoK8
 
Way back when, in White Dwarf issue 207, they ran an article about a "vertical" table. During a discussion with a friend, he mentioned if he was gonna bother getting into Necromunda it would be on a table like that. I did some research and eventually found the article archived and, looking at it, it didn't seem like an impossible task to recreate it. An impulsively bought Proxxon Cutter (with some glowing recommendations from Anton over at Anton's Wargame) and we were on our way.

First some notes. After monkeying around with some figures I've come to the conclusion that the Ambot is the tallest Necromunda specific Figure in the range except maybe the chaos spawn. The Forgeworld Ortuum- 8-8 figure is ever so slightly taller but giving a 3 inch gap between floors was enough for either to fit without scraping the ceiling.

The depth of each floor is 60mm and is cut out of 1in thick board. The reasoning behind this is simple, two figures can pass each other but no one can fit by the Ambot.

The floor and Structural Walls are cut from 1.5in board and the over all dimensions are 28" x 36" x 42" These dimensions are the result of measuring the trunk of my SUV and the airducts above my gaming table at home.


The structural parts were glued together with Liquid Nails and reinforced with toothpick "rebar"


Once the structure was together it was simply a matter of figuring out where to put each wall and floor. I've decided each corner will have a "point of interest" and in the case of this one, that point is going to be an elevator shaft.


Above is about an evening of work put in. The floors and walls are cut into 60mm strips very quickly with the proxxon and then the thing gets assembled.

The process it self is simple. George and I went Floor by floor saying things like "what if the gaps on this side this time" and simple cut parts to fit, stuck some toothpicks in the side and glued it into place. There is a "measuring jig" cut from some foam to keep the 3 inch gap relatively the same across the whole board but otherwise things were generally eyeballed. For all the floors we used Titebond Wood Glue. Its easier to work with, clean up etc, and a little cheaper to boot. We feel pretty strongly that things don't need to be "perfect" because who else has an almost 4 foot tall board like this to play on? Almost every layout decision is spur of the moment and you can see some marks on the parts for ideas that are still forming.

Here you can see a shot with some figures on it.


The end goal is lofty still but I figure the board can be used obviously for necromunda but also for games like Reality's Edge, This is Not a Test, Hardwired, Zone Alfa, Judge Dredd, Zone Raiders ect ect ect. And in the event I get tired of it, I know of both an infinity and an existing Necromunda group who would probably love the donation.

This is obviously early days still but I wanted to get this thing "out into the wild" so people can see some of the process behind it and hopefully my board can inspire others to build something crazy

Saturday, December 14, 2019

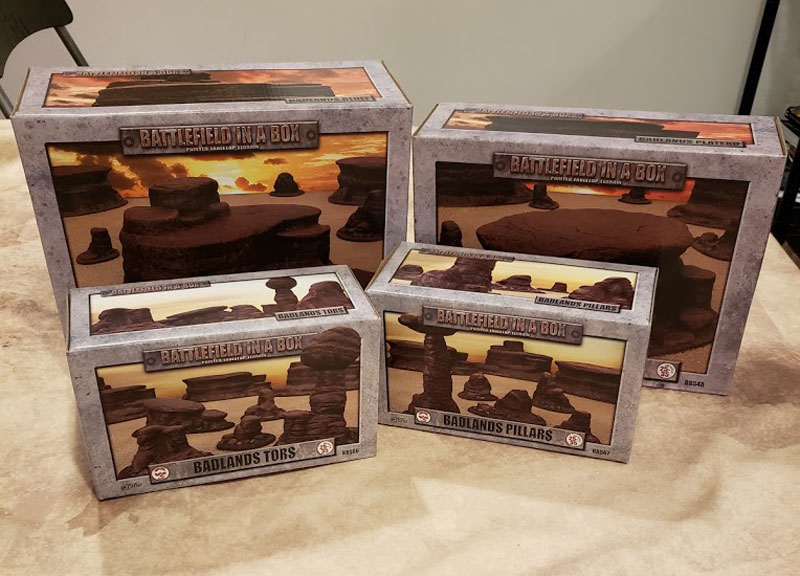
Review of Gale Force Nine Battlefield in a Box: Badlands Terrain

Recently I picked up the whole range of Badlands Terrain from Battlefield in a Box by Gale Force Nine. After Searching around a bit online for information I couldn't really find the information I was looking for. The two things I was the most interested in were 1) How much space will one box of each configuration fill? 2) How does this stuff look on a "desert" mat?
Here's how this stuff looks as well as some thoughts on the range and photos of it "in action"
First of all here are the sets laid out on a 4 x 4 table.
I think you can already answer both questions with this photo. Assuming that you're planning on adding some sort of other terrain, whether its roads building etc, you can probably get away with one set each for a standard game of whatever.
Having said that the dark reddish color of these pieces makes them much more useful in my mind for things like 40k, Mad Max, This Is Not a Test, or Gaslands then say something like Modern Middle Eastern gaming for example. They would probably work in an Old West Setting.
For scale purposes pictured are a GW Rohan Warrior, a GW Necromunda Figure, and an Eureak Modern Taliban Figure.
First is the Pillars Set
The "Tors"
 The Plateau
The Bluff
 Finally a shot of a 4 x 4 with the sets mixed in.
So what do I think? I think I'm a fan. Our club had talked in the past of playing Gaslands, or Gorkamorka and I think this stuff is perfect for it. It came exactly as you see it and all I had to do was unwrap the bubble wrap it was packed in and boom, good to go. Having said that, it's too red in my opinion to use for Middle Eastern Terrain which is fine but a little disapointing. I think with the addition of some other less scatter type pieces or one more of the larger formations youd have a pretty nice table.
There are a couple minor problems, however.
First of all, the way they're packaged. The sets come with each piece wrapped individually in bubble wrap. Evidently this isn't enough as you can see below.
These appear to just be hotglued on to me, as evidenced in this photo. Not a deal breaker by any means especially considering the low cost.
One other slightly more major issue however is the warpage on this piece
I ordered one set of the pilars off of ebay prior to ordering this larger pile from my FLGS and it appears they used to be packaged differently and although I'm sure the new way is cheaper, I'd rather have stuff arrive intact
So, long story short, I'm happy. The cost is right, the whole set retailing for 120 It's an affordable way to fill a table. Sure, I could probably make something similar with foam but honestly, I won't. I'll make a plan to, and never follow through. I think these photos will speak for themselves and give people a better idea of how the stuff looks on an average table.