Reposted with Permission on News from the Front
For as long as I've been a gamer I've struggled with trees. It seems like a no brainer sure, but I can't stand clump foliage. About 10 years ago, I spent a weekend making trees. Slathering Woodland Scenics tree armatures with glue and getting all sticky trying to make trees look presentable. When I finally got some stuff finished, I thought they looked great, but they fell apart after a few months of use. Over the years I've seen some great solutions but for what I wanted nothing fit exactly what I was thinking. Battlefield Terrain Concepts makes some amazing trees but for how many I wanted, it was a little beyond my budget. Woodland Scenics themselves makes some great premade trees as well but they aren't quite as durable as I'd have liked, and still need to be based in some capacity.
With all this in mind, I decided to 3d print my forest. After a bit of research, I found this set from Printable Scenery.

The set comes with 5 different tree designs, 2 different tree stumps, and 2 fallen trees. The canopies are separate pieces and come in 4 designs. The product page shows which parts to print for which tree.
In order to fulfill my needs, the trees need to be readily available, easy to assemble or paint, have decent variety, and be durable. Aside from print time, these check all of those boxes so I started printing.

I started by printing a pretty large batch of stuff. The key to the plan here is two things. First of all I printed everything for any given tree in one shot and while printing I set the settings to print with a brim and with a perimeter. This means when any tree prints it will effectively be grouped together. This meant I could print a tree here or there as I was running low on a spool over the course of a few months. Each Tree took somewhere around 10 hours to print so I'd usually fire one up around dinner time and pop it off the plate before work the next morning. You can see here how the tree almost prints on a sprue, keeping the canopies sort of attached. The thin layer on the bottom peels right off by hand.
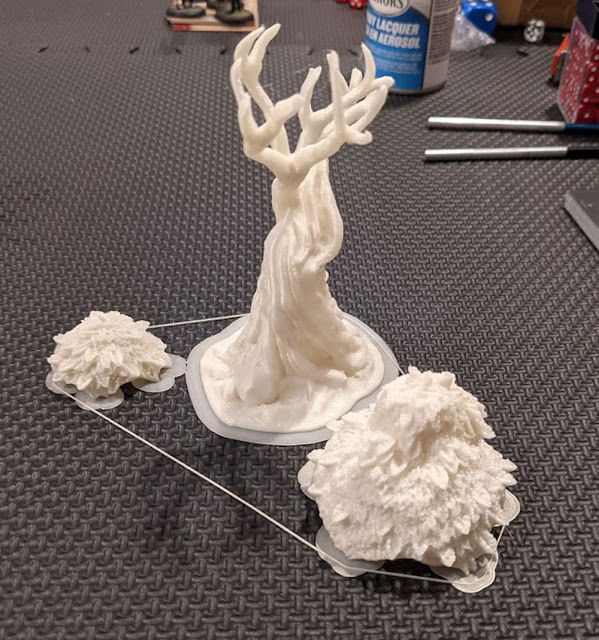
In order to meet one of my other demands (variety) I printed some trees at 75% size. You can also increase the size or mirror all the parts to get a slightly different look. Basically when it's all said and done, you can get a reasonably variety going.
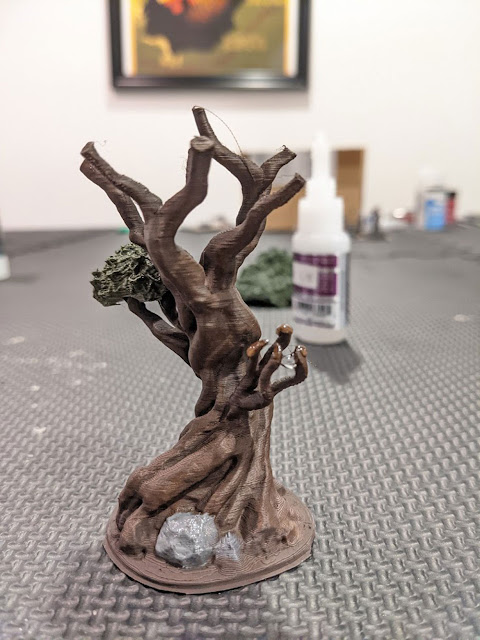
The next step was to prime everything. I labeled each tree on the bottom with a letter and used Rustoleum Camo Dark Green and Camo Dark Brown Spray primers. Finding a flat brown spray was a bit of a challenge but I'm reasonable happy with these colors. All the canopies are sprayed at the same time and then resorted to match the trees they printed with.

Once all the individual parts are sprayed, everything is drybrushed and details are painted. I used cheap acrylics from a craft store like Michaels. There's nothing stopping you from using Vallejo, but I like the artist loft paints for terrain because they tend to hold a little better with use. For this project I used Burnt Umber and Gray from Artists Loft and one of the greens from the Liquitex Basics Range. You don't need these specific colors or brands, just a gray, a mid brown, and a medium green are fine.

Drybrush the tree all over with your medium brown and the canopies all over with the green. I was really rough with the green drybrushing and let a ton of it get in the recesses as well. There's no need to be careful here in my opinion. At this point the project was all about speed. You can see how the medium brown makes some of the detail pop without looking too over the top. Since these were printed on a FDM printer, there are some layer lines visible. As I've mentioned before, I dont really worry about it on wargame terrain, but the drybrushing has a bit of a tendency to highlight the layer lines, especially on the tops of surfaces. Using the thick craft paints has the added bonus of mucking up some of the layer lines. When Drybrushing, leave just a tiny bit more paint on the brush than usual and it seems to be ok to my eye.

By varying up the "wetness" of your brush in the green drybrush step, you can see how it changes the tone a little bit. It's subtle but definitely helps break up the monotony of the green a little bit.

The next step is to pick out the rocks around the base with grey and then finally glue it all together. Having based the tree in brown, means you dont really need to be too careful with the grey for it to all be tied together. I switched over to a size 4 synthetic to paint the rocks and just made sure they were covered. When glueing the canopies on, I made sure to sort of slather the ends of the branches in glue. When the canopy is attached, it can be hard to tell exactly where it will sit ahead of time, so better safe than sorry.
And the final Product

All in all, I think the trees take something around 10 minutes each to paint and the longest process is definitely actually printing them. I've been printing trees off and on for months but I think its well worth the effort. Obviously you could take these same prints and really go to town on them with some more detailed painting but for fleshing out a game table I think this does the job wonderfully.
Working in an assembly line, the entire set took about an hour to get everything brushed and glued together.
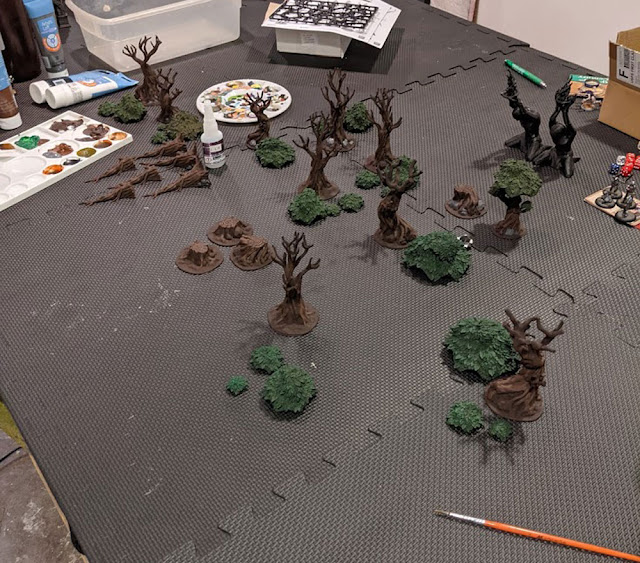
And here we go! 10 trees, about a month of printing off and on and a little bit of paint work later.

It doesn't seem like a ton, but this set fills a 3 x 3 board pretty nicely unless youre looking to do an actual forest. As far as scatter terrain goes, I think this is more than enough for an average game but I'll probably be printing another 10 or so over time to fill out the table for games like Flint and Feather or Carniverse

Adding just a couple pieces from my collection here, you can see its basically all you'd need for a small skirmish game.

So, how do I feel about this as a solution? I think I'm happy with it. I didn't realize until writing this article, just how much time I'd spent printing stuff for it. The longest tree took about 14 hours to print and thats a pretty long time to tie up a printer when you consider that there's 10 trees on the table. I really like that I can set up the printer and then go on to something else though. In terms of variety, theres just 3 of the five designs on this table. The set came with another two tree types that I haven't printed yet and theres still the option to vary up the designs present by changing the size or mirroring parts.
In terms of cost, I haven't done the math but per tree they arent on the expensive side as filament is pretty cheap. The labor involved wasn't bad either with how easy the trees are to finish.
Overall then, I think this was a good investment for my terrain collection. I don't think the trees look as nice as the foliage types but they are a lot more durable and if I ever need more, I can simply hit print.