Something I've mentioned before is my growing interest in post apocalypse gaming. I've long been a fan of This is Not a Test and back in November at Fall-in I picked up the 7TV Post-Apocalypse Starter Set (and a small fortune in figures from Crooked Dice) from my friends over at Phalanx Consortium. This have sat idly by while I've debated what exactly I wanted to do with the project. In the mean time, I've also picked up a bunch of the Lead Adventure Forum Stalker Figures and have decided it was time to get some terrain going. The stage is set, lets dive right into the content.
This article was also published on the Michigan Toy Soldier News From the Front Blog
Building a Shanty Town: Painting Tutorial
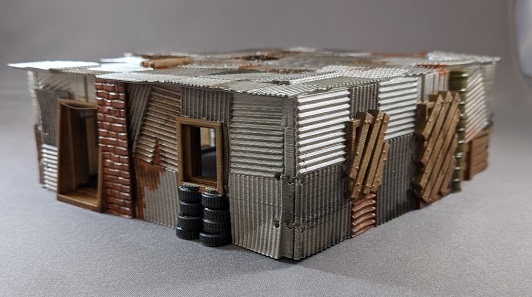
Every so often, I'll come across some sort of figure, terrain piece, vehicle, whatever that just screams "paint me!" While browsing thingiverse after game night one week, I discovered this amazing bundle of files to make a totally modular Shanty Town by Terrain4Print. If you have a printer of your own and want to follow along with my guide the files are available below. Here's the example photo that started it all.
Buildings
Barricades
Junk
Obstacles
Any 3D printing project is gonna start in the same place, at the slicer. I kept my settings pretty standard and opted for a .2 layer height using prusaslicers default .2(Speed) profile. Let's address something up front, Layer Lines. I don't deal with them. When comparing the costs, availability of models, ease of access, range, modularity etc etc etc between 3D printed terrain and commecially available stuff, layer lines are simply part of the equation. If you don't like the lines (and honestly, I don't love them) you can spend some time sanding, then finish with a primer like 3D Prime from Badger to hide as many of the lines as possible. You can also limit the lines from the beginning by printing at a smaller layer height but because of the sheer volume of stuff coming off my Prusa Printer, I almost always choose to opt for speed over detail. Once a part is loaded into the slicer, its off to the printer to wait.
In this particular pack from Thingiverse, you simply pick 4 walls you like, 2 short and 2 long, and print the roof that fits to that design. I chose 4 walls, 2 with doors and windows, found the correct roof and began printing. The total print time for the 5 parts for this building was around 20 hours and was printed in Prusament Vanilla White
I assembled the building in the usual way with super glue. There's a pretty easy system for making the roofs removable but I decided to glue the roof on for stability.
Once the building is assembled it's time to hit it with some paint. I usually prime all my 3D printed stuff. I decided to prime these with Army Painter Gun Metal spray. The majority of our building is this metalic corrugated metal material and this will save a lot of time in the long run.
The first step is pretty simple. Wash a handful of the panels with Black and a handful with dark brown. There's no right or wrong here just, vary the colors a bit so its not all the same shade of metalic.
Next up, I took the building to the workbench to basecoat all those non-metallic details (bricks, tires, wood, cloth) in what ever colors I felt like. I used my usual colors for these, Old Wood and Flesh Shadows from the Vallejo Panzer Aces line for the wood and bricks, Vallejo Black Grey for the tires and Brown Violet for the cans.
Once all the colors are laid down and we're happy with the general scheme it's time to do some weathering. I took the building back down to my game room, grabbed some Vallejo Acrylic Washes and Weathering Effects and a cheap flat AK brush and went to town. I used the following washes to get the job done.
At this point you simply want to weather the model, I started by washing all of the "details" with black or dark brown depending on the material. The wooden bits and brick parts got a brown wash whereas the tires and washing machine got a black wash. The cans got both. Using the dark rust wash, I painted splotches (technical term) any where the metal was worn or I wanted to break up the color a bit, typically where two panels met but again there is no wrong answer. The Rust texture is "stippled on" roughly. over areas where the rust should look really bad. There's just a hint of texture to this one and I love the effect it leaves. Finally, I sparingly added some streaking grime near where the roof meets the wall in spots to show a gross build up.
At this point I'm calling the piece done. This is the kind of project you can pant in a day and with how quick these paint up, I'll be able to cover a small table in a weekend. I also think its a great first project for someone wanting to dip their toes into a terrain project because, believe it or not, this is actually only the second terrain piece I've ever finished painting. Most of the terrain I've done has either been pre-painted or I've had it painted by someone else.
Next up on my agenda for this project is to start doing some multi floor buildings, then its time to print and paint scatter terrain. Finally, I'll finish the project with a wall to defend the town.


No comments:
Post a Comment