Pages

Showing posts with label Skirmish. Show all posts

Monday, September 28, 2026

Necromunda (1) - Goliath Reinforcements Wave 1

 You know what's crazy? Calling this post "1." Between the Boarding Actions, AHPC, and other odds and ends, I've posted a ton about Necromunda over the years. Still, it's time to formalize this as a heading.


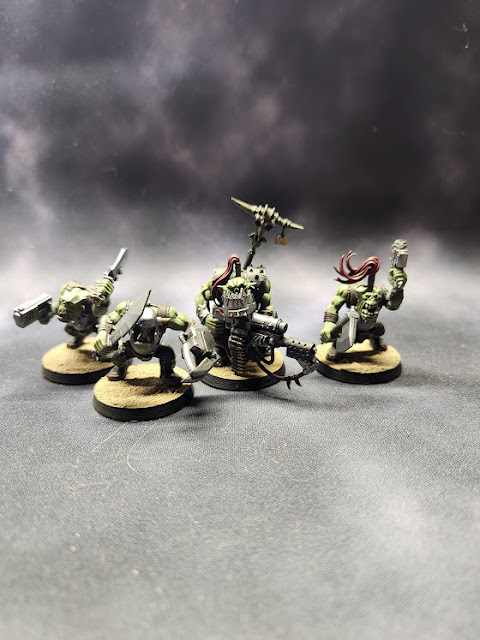
 This time around, we have the Goliath Forge-born and Stimmers box. I had these sitting in the "to do" bin, since their release. I painted them using colors that seemed close enough (the red is mephiston, the green is AK Light Green) to my original Goliath box. I did opt for Marine Juice this time instead of Strong Tone, which I know I used on the original necromunda stuff I did. 

My plan here is Goliath, until its all done, then odds and ends before moving to another gang. So next is the brute and the old resin sump-kroc. I do have the new box on order, and the new starter set behind me as I type this so it seemed like a good opportunity to finish these off.  

Monday, January 15, 2024

Boarding Actions Build Log (1)

 I've always maintained that I like the idea of 40k even if I don't adore the game itself. The idea of a 2k army is daunting and expensive for my ADD riddled brain. I have been flirting with the idea of a zone mortalis board for a long time (see earlier posts on this very blog) but to be honest with the new Boarding Actions Game mode and terrain I'm probably scrapping that terrain. You can google Boarding actions to look at the pretty pile of sprues but in short, the idea is "lil fights in spaceships" 500 Points, limited options, quicker games.

I wasn't super interested in the box itself until I stumbled across this originally on reddit. Orkitect Studio has produced a 3d printable version of the board. Thinking I could save a bit of money, I opted to start printing.

When these tiles work they are absolutely incredible. There's a whole system in place for magnets and wires to make the tiles pop together, there's options for all magnets or snap fits for no magnets and the designer has already modeled and released some of the neat unique bits from one of the expansions. 

Cue the sound effect of the record scratch

I wrote the above in march of 2023. Its why "finish boarding actions board" made my list two years in a row. Because I'm lazy. In my defense this time I have some legitimate concerns.

The text you're reading now replaces a pretty lengthy paragraph I had written back in march and the keen eyed among you may notice the pieces are made of two different materials if you look close. One of the issues I had in 2023 was that my prusa finally took a crap and blobbed up. I spent the better part of a week disassembling and what have you to clear jams and scrape plastic. I finally came to the determination it was gonna need a new thermistor, then a new hot end, then this then that. I tore the thing apart and chipped away on repairing it for a few months where it sat unused next to my Mars 3. An idea sparked and I decided to start this project on the Mars. I won't bore you with too many details but needless to say, it was not the right medium for this project. I spent a small fortune in failed prints and broken resin and fails and cleanings. I said I'd fix the printer but with my day job (fixing 2d printers) I never had the drive to actually finish it. Around Christmas I ran some numbers and made a decision to replace the device with a new Bambu P1S. There will be more on that at a later date, but the main take away here is this

I went from this


to this in about a week.


So what you see now, is a whole boarding actions table. I purchased a cardboard mat from one of the starter sets and have since this photo glued in all the magnets. Next up is painting and wire on the column pieces.

Saturday, April 8, 2023

Experimenting with Slap Chop and Modulorka

Hi, Long time no see.
I won't bore you with the details but it's been a busy while since I've seen you last. I changed careers, moved, and got married since I last sat down to write an actual article. Needless to say, I had a busy year. Let's dive right into the topic of discussion though and wrap with some thoughts on what's next at the end. 

If you're like me and you tend to put YouTube or miniature podcasts on in the background while you paint, you've almost definitely heard of SlapChop painting by now. The term seems to have been coined by The Honest Wargamer and you can see his original video here. Long story short the technique is as follows. Prime Black, Drybrush grey and then pure white, finally slather the mini with "contrast" paints. I put contrast in air quotes now because the technique is definitely not limited to Games Workshop's official contrast range and will definitely work with other companies equivalent ranges (like the new Army Painter Speed Paints or the upcoming Vallejo Xpress Color)


When I first saw this I was skeptical. My first thought was definitely something to the effect of "yeah, its called painting, why bother with the fancy names?" I'm a big fan of contrast style paints and my biggest criticism comes down to the marketing approach of "one thick coat" not being the whole story. I think like any other paint, its a tool and it should be used "correctly." The main focus of the technique is to get stuff on the table, in a reasonable amount of time, to a decent standard.

As I mentioned, this is pretty topical now, with several content creators all posting their take on it. I wanted to give it a go myself but was looking for a project to use it on. This Video by Miniature Hobbyist popped up on my feed right around the same time This Video popped up by On Table Top. GorkaMorka, 3d printing and a quick project all in one go. The stars have aligned. Modulorka is basically a free to play Ork on Ork skirmish game. Currently free to download, they also have a kickstarter and a patreon going if you want to support them. The free rules bundle comes with a single ork infantry figure. It took about two hours to print and came with both supported and unsupported versions. There was a super minor defect on my print that is more than likely my settings but I left it as it looked more orky to me anyway. 

 I printed, cured and then cleaned up the pieces and then followed the steps as instructed. Black, grey, white primer applied I began with the slapping.

 I used the relatively new Gutrippa Flesh for the skin, and then Snakebite Leather, Wyldwood, and Black Templar for the majority of the details. I was originally going to paint the club the old fashioned way but settled on the new Garaghak's Sewer. I wasn't willing to skip metalic paints however and painted all of those details with 3G Gunmetal. I also painted the base in my usual methods with a block paint and few layers of drybrushing. 

Here's the kicker. It's just like using contrasts normally but I think generally speaking the results are a lot better. In particular what this method did to the skin, club, and boots, I'm thrilled with. Some issues that stood out are the usual issues with contrast, you still need to be wary of pooling and the reality is some colors simply don't show up over dark surfaces (like the skeleton horde I used on the teeth.)
 
As I said earlier, I was a little hesitant when I first came across this whole viral sensation. Not necesarily because I didn't think it would work but more so because it was sort of being sold as a one stop shop in the same way contrast was originally. Theres still certain things I'll always paint traditionally (mostly metalics) but in general I was pretty pleased. I used the brushrage app while I painted and the whole model including the base and drybrushing was less than an hour. Now that I've done it once I could easily cut that time per model down drastically and I definitely think the added step of drybrushing is easy enough that I can't imagine using contrasts over just a white primer any more. 

It gets better

After painting this guy, writing this article and sitting down to another paint session I did an entire starter force for modulorka. All 4 guys including the bases came in at 1 hour and 46 minutes once I had a scheme. 


This was originally written in October of 2022.

Thursday, April 6, 2023

Violent Dark (1) - Intro and Other Games April

 Hello

No secrets here that I'm sort of a fan of Black Site Studios. I think the stuff they make is neat. Our game of the year on the podcast the year it was released was Don't Look Back (second edition preordered already) and I have most of their games. There's a neat push right now through several content creators for what is being referred to as "Other Games April" this Miniac video sums it up but basically its a spotlight on indie games. In honor of the event and because I never touched this stuff after the first week, I decided I wanted to focus in and try and get my Black Site Games on the table this month if at all possible. DemonShip is coming (not soon enough) and we're going to start with Violent Dark

I backed this project through the BSS Backroom program which is a sorta-kickstarter program. I backed the second highest tier as I didn't think I needed the mdf terrain. At adepticon last year I picked up most of the other releases I didn't have. Here's the haul


Violent Dark is a co-op and solo focused space thriller in the vein of aliens. You control 4 crew members, theres missions, its got fun looking rules that I'll cover once the game's hit the table. 

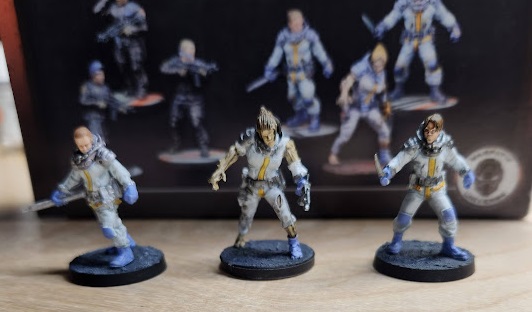
Aparently I got as far as assembling the core set and getting paint on two pieces. It looks like I printed the bases for most of the crew but as the FDM printer is currently down, I've got a back up plan for the rest. 


The aliens we're a very slight disapointment. Mostly, I wish they fit on the bases provided. The resin is a touch spindly and bendy and they just don't sit nice on the slightly too small bases. I'm not sure how I'm going to paint these yet. You do get a ton of bits for them which is neat.


As a part of the initial buy in, and available later, there are a few expansion type pieces. One of these is rogue synths which adds a new type of threat. 


There was also a vac-suit and xenos hugger type of expansion


The xenos one comes with new rules for the threat. These are almost definitely my favorite sculpts in the set.

These expansions came packaged in the same bags as the bonus minis. The bonus minis were a few more crew, some turret guns and this cat.


After digging everything out I got most of everything built save for a couple aliens and the turrets. I also opted to leave the synths in the box for now. The plan is to get this on the table soon so we're going to start with an alien and two more crew as a minimum. 

Will report back soon

Sunday, April 2, 2023

Deadzone (1) - Mazon Labs Starter

 I picked these up at Adepticon 2023. I actually got home from the show on Sunday, unpacked the car, and primed them. I wanted to crack these out as quick as possible so the majority of the heavy lifting is contrast paint. This project ended up taking about a week all told. I thought I'd end up finishing them on Monday but ended up not picking up a brush for most of the day and opted to just chip away on these throughout the week. We're just going to need to deal with some god awful photos for a while as well folks. The lighting in this area is just not good for this but I'd really like to continue blogging.

  I don't have a ton of love for these figures. They were all one piece castings except for the leader who was 3 resin pieces. As mentioned I let the contrast do the lifting and wanted to crack them out pretty quick. We also managed to get a game in where they lost pretty harshly. I'd like to get a few more games in before I move over to veer-myn as a more permanent home. Still, a nice quick project to kick off some painting mojo. While working on these I chipped away on a bunch of other stuff putting either finishing touches or dents in other projects so it was nice to be at the desk this much. In no particular order are some shots from the game (I lost 12-0) and some "close ups" (I know they're bad). I'll plan on taking a few nicer photo booth photos when I finish more figures for the faction down the road but for now its progress


As an aside, This is another goal on the list 
 Play Deadzone
 
On to the next project

Wednesday, February 3, 2021

Cavemen (1) - First Figures

 Weirdly I was bitten by the caveman bug. I'm not really sure why but the idea of tribe on tribe skirmish gaming seems like itd be fun. A few shows ago (now years ago haha) I purchased 3 blisters from Copplestone from one of the vendors. I just got around to painting them up.

First up the Cavemen Characters


The official artwork has a lot of warpaint and such on them and I may go back at some point and add some but until I know what rules I wanna use, I'm not worried about having specific characters

All of these were painted primarily with contrast paints and I'll post the recipes below
 
Here are two packs of Cavemen, cleverly titled Cavemen and More Cavemen.


The paint jobs were dead simple. Darkoath Flesh, Snakebite Leather, Wyldwood, Black Templar, Basilicanum Grey. The bones were picked out in Iraqui Sand, the weapons with PZ Aces Old Wood. 

Tufts are Dark Green Shrubs from Gamers Grass.

I'm about half way through a wooly mammoth now and I have a T-rex to paint. I'm resisting the urge for now to buy some figures from lucid eye until I thin out more of the "to finish" pile. 

Rules we're discussing includes Tribal, Primevo, and Savage Core.


Tuesday, October 13, 2020

Carnevale (1) - Rashaar Starter Gang

 Over at Hobby Knockout, we recently decided we were going to do a 24 Hour live stream for charity. This all started because Paul watched THIS video from Goobertown Hobbies about painting a whole start collecting box in 24 hours.

I've always prided myself on speed but haven't ever tried something as specific as this (mostly due to my schedule) and we began spitballing ideas. One of the ideas in particular was to buy, split and paint a 2 player starter set. We mulled over a few ideas including The Lord of the Rings Pelenor Fields set, the Last Argument of Kings Starter and the Carnevale starter. In the end we each decided to do our own project for various reasons but I ended up purchasing the Carnevale box for myself anyway. 

I went with this two player set HERE because the value seemed insane. We're going to do a deep dive into the game eventually but I spent the last week painting stuff from the box, starting with the Rashaar gang. 

Here's the Gang in full


So far I'm super enthusastic about it. The starter sets components are excellent and really make me excited to get some games in. On Thursday we're going to start playing through the "learn to play" campaign and if it goes well I'll replace the card scenery supplied with some of the great looking MDF stuff TTCombat does.