
We did a full review over on the podcast which you can listen to HERE if you want to know more
We did a full review over on the podcast which you can listen to HERE if you want to know more
If you haven't read about this yet, check it out HERE
So lets check in. How did I do?
In short. Not great. I knew the results would be less than flattering but I thought I'd paint more in general. The total number is around what I thought it'd be but I did think I'd have more figures done to show for it. The constant reminder of a running total did however prevent me from buying more things than I normally would. As an off the top of my head example, I was really on the fence about grabbing the new kill team box and the penalties for buying something at launch were enough that I decided against it for now.
Because of the rather loose nature of the rules, the challenge motivated me to finish a lot of stuff that was just sort of close to done but not finished because it was easy points. Right off the bat, the night before Stellacon, I finally got around finishing the bases on some old WW1 British as well as finishing a whole starter force of Germans, all for Blood and Valor (Review HERE)

At Stellacon, I blew a whole bunch of stuff out, in the hopes of actually lowering the number some. Although that worked out nicely, I also walked away with 1k points of slaanesh and a Nights Watch army. Though I left that day with a negative score, it was the last time I'd have that.
Twice this Summer I've found myself in Chicago at the excellent Games Plus store. Discovering an amazing game store like that will put a dent in your balance for sure. I walked out both times relatively light but definitely with an addition to my score.
The launch of Dominion was a huge dent because aside from being a huge box, I picked it up on release day and took the penalties there. So Far I've only finished these. I have plans to convert the Stormcast so those will have to wait until later.

Some other addition to my pile of shame include some 3d printed terrain, a ton of stuff for conquest and the other half of my 3d printed 10mm ogre army.
I did have one really excellent evening of painting where I finished a bunch of Lumineth stuff, a bunch of Crisis Protocol stuff and my first Moonstone figure.


There were a few other purchases here and there but unfortunately as of the end of this season, im sitting at 232 and coming in second to last place. I'm writing this a little early and there is a chance I'll get below the 200 mark but its unlikely. I have a few packages out standing (Lunar preorder, moonstone kickstarter) that will hurt when they arrive but I also don't know how much time I'll have to paint this month.
I'm definitely glad I participated but my goal for the fall season is absolutely to get bellow 100, and ideally below 0. Only time will tell
I have a smattering of "in progress blogs" I've been working on but to be honest, it's a figure here, a building there and no real completed anything. Lately I've been smitten with MCP. Just before I really dove into wargames, hobby stuff and painting, I was big into comics. I had discovered them in earnest pretty late in the game, being drawn in from video games like Marvel Ultimate Alliance and Batman Arkham Asylum. I dove in head first and started with the Civil War Marvel stuff and began reading whatever I could. When I got into hobbies, something had to give and I haven't really read any comics since. When Crisis Protocol was announced I put in a preorder as soon as possible, played a couple demo games and thought "Ok, this is pretty neat"
Like all projects, I threw the game back into the pile of shame, breaking it out once every few months to demo it to someone new, and moved on to other projects. Recently, I had a friend visit from out of town who wanted to try it and his enthusiasm encouraged me to break everything out again, and finally play with all the bells and whistles. This encouraged me to teach Erin how to play more seriously (we had done a small "lite" version of the game months earlier) and both of us were surprised at just how much we both liked it. Ever since then, the game has occupied most of my painting time and all of my hobby time with a bunch of side projects as well as getting me back into comics and buying a subscription to Marvel Unlimited (as a brief aside, I just read the 12 issue run of Inhumans from the Marvel Knights era and was super surprised at just how much I liked it.)
I had painted a few figures when I first got the game, mostly just the ones I wasnt as interested in (Black Widow, Red Skull, Ultron) and have been finishing stuff up left and right. To that end, heres some of the figures I've finished lately.
Spider-man from the Core Set


That's right folks, it's time for another "Matt does a painting challenge in the hopes of putting a dent in the grey tide" post.
I stumbled across this Dana Howl Video here https://www.youtube.com/watch?v=Po3u5ukzbpU

Finish painting a model -1
Buy a model +1
Give away or sell a model -1
(stacks with commission painting)
Complete a unit - 1 additional
Complete faction starter -5 Additional
Complete 2 player starter or board game -20 additional
Box with between 1-10 figs bought within 30 days of release +5 Points additional
Box with between 10-30 figs bought within 30 days of release +20 Points additional
Box with between 30+ figs bought within 30 days of release +50 Points additional
Buying stls doesnt add to total until they are printed.
Gifts and trading dont change point totals.
I'll be doing this with anyone in our group who wants to join in and it looks like other people might be playing on social media with #shamegolf
Recently Added to my Pile.
First up, Here's the Bounty Hunter Ortruum 8-8

And here's the Starter Gang I finished up for Necromunda

Real short and sweet this time around.
Weirdly I was bitten by the caveman bug. I'm not really sure why but the idea of tribe on tribe skirmish gaming seems like itd be fun. A few shows ago (now years ago haha) I purchased 3 blisters from Copplestone from one of the vendors. I just got around to painting them up.
First up the Cavemen Characters


Reposted with Permission on News from the Front
For as long as I've been a gamer I've struggled with trees. It seems like a no brainer sure, but I can't stand clump foliage. About 10 years ago, I spent a weekend making trees. Slathering Woodland Scenics tree armatures with glue and getting all sticky trying to make trees look presentable. When I finally got some stuff finished, I thought they looked great, but they fell apart after a few months of use. Over the years I've seen some great solutions but for what I wanted nothing fit exactly what I was thinking. Battlefield Terrain Concepts makes some amazing trees but for how many I wanted, it was a little beyond my budget. Woodland Scenics themselves makes some great premade trees as well but they aren't quite as durable as I'd have liked, and still need to be based in some capacity.
With all this in mind, I decided to 3d print my forest. After a bit of research, I found this set from Printable Scenery.

In order to fulfill my needs, the trees need to be readily available, easy to assemble or paint, have decent variety, and be durable. Aside from print time, these check all of those boxes so I started printing.

I started by printing a pretty large batch of stuff. The key to the plan here is two things. First of all I printed everything for any given tree in one shot and while printing I set the settings to print with a brim and with a perimeter. This means when any tree prints it will effectively be grouped together. This meant I could print a tree here or there as I was running low on a spool over the course of a few months. Each Tree took somewhere around 10 hours to print so I'd usually fire one up around dinner time and pop it off the plate before work the next morning. You can see here how the tree almost prints on a sprue, keeping the canopies sort of attached. The thin layer on the bottom peels right off by hand.
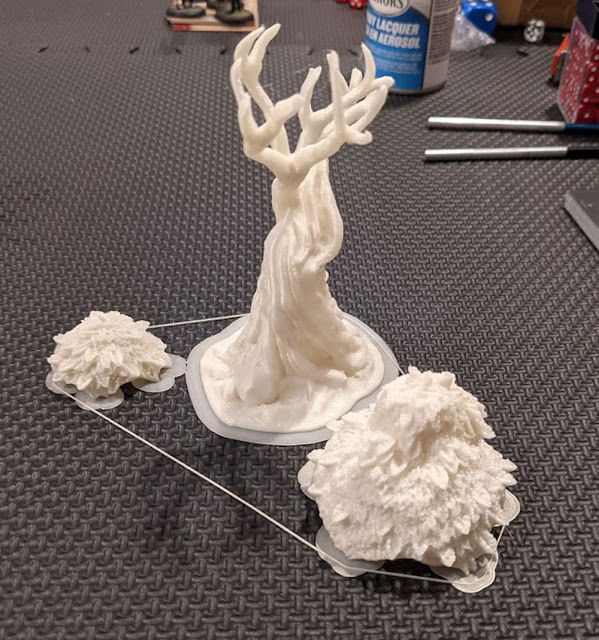
The next step was to prime everything. I labeled each tree on the bottom with a letter and used Rustoleum Camo Dark Green and Camo Dark Brown Spray primers. Finding a flat brown spray was a bit of a challenge but I'm reasonable happy with these colors. All the canopies are sprayed at the same time and then resorted to match the trees they printed with.


By varying up the "wetness" of your brush in the green drybrush step, you can see how it changes the tone a little bit. It's subtle but definitely helps break up the monotony of the green a little bit.

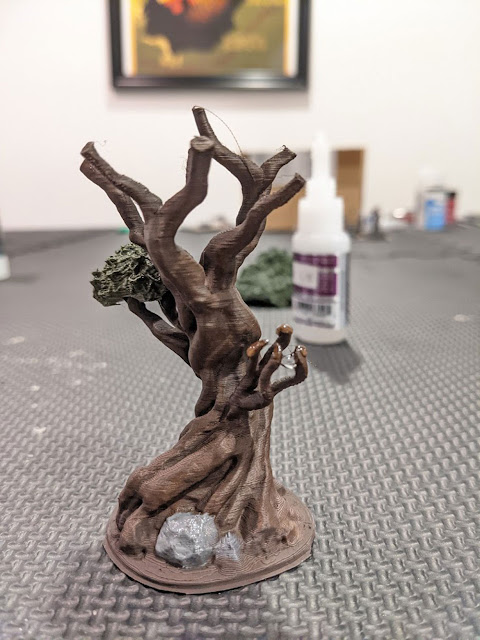
And the final Product

All in all, I think the trees take something around 10 minutes each to paint and the longest process is definitely actually printing them. I've been printing trees off and on for months but I think its well worth the effort. Obviously you could take these same prints and really go to town on them with some more detailed painting but for fleshing out a game table I think this does the job wonderfully.
Working in an assembly line, the entire set took about an hour to get everything brushed and glued together.
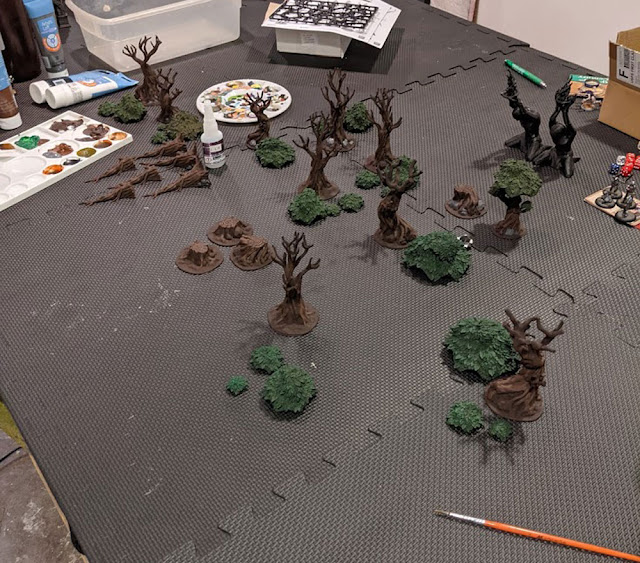


Overall then, I think this was a good investment for my terrain collection. I don't think the trees look as nice as the foliage types but they are a lot more durable and if I ever need more, I can simply hit print.
